


Introduction to OLED Displays
Organic Light Emitting Diode (OLED) displays are mega zesty for digital screens. They skip the boring backlight old LCDs need since they shine their own light. That gives super dark blacks and spunky contrast. These are great for little gadgets that sip power, like smartwatches, IoT doodads, or tiny systems. Arduino geeks totally dig them because they mesh so well with Arduino boards.
OLED Display – Overview
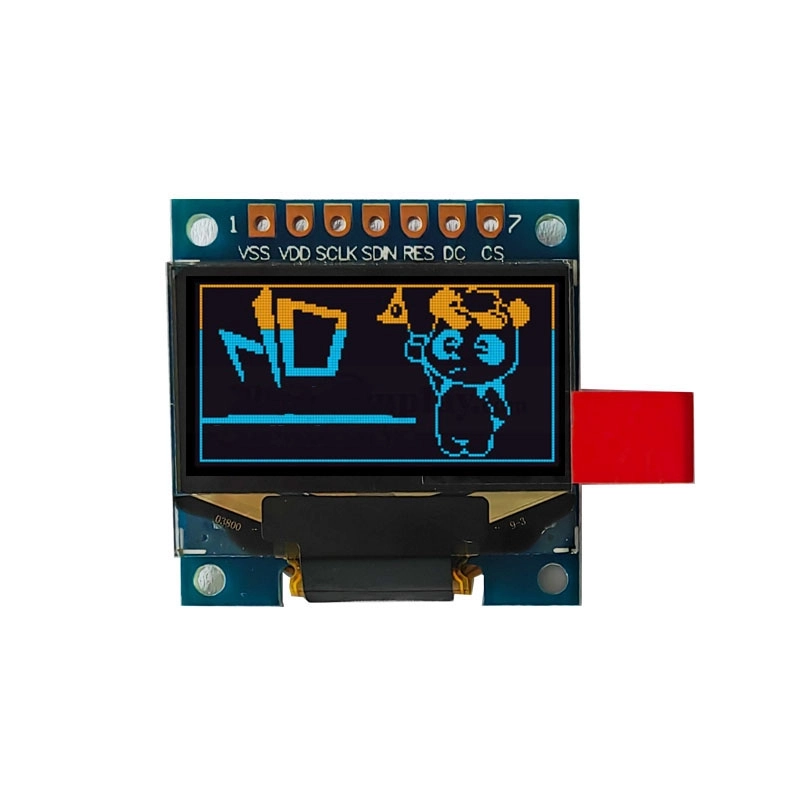
OLED displays pop up in all sorts of sizes, pixel counts, and hookup styles. That makes them handy for a bunch of fun projects. The 0.96 inch OLED Display Module Arduino is a spiffy pick for wearables like fitness bands, IoT setups, factory controls, or DIY stuff with Arduino or Raspberry Pi. They’re also awesome for medical tools needing crisp visuals.
Types of OLED Displays
OLED modules use two main ways to connect: I2C or SPI. The big-deal controllers are SSD1306, SH1106, SSD1327, SH1107, and SSD1309 for small OLEDs. They come in different sizes and pixel setups, like 128×64 or 128×32, with 0.96″ or 1.3″ being super common, plus some bigger ones.
Circuit Diagram for an I2C OLED Module
The setup’s a cinch with just a few bits. It’s got a voltage regulator (XC6206P332) to cool the power down to 3.3V. Plus, it has pull-up resistors for I2C lines and a resistor to pick the I2C address, usually 0x78 or 0x7A.
I2C OLED Module Interfacing Connection Diagram
Wiring an I2C OLED is a breeze. Plug the GND pin to Arduino’s GND and VCC to the 5V pin. Then hook SCL to A5 and SDA to A4 on an Arduino Uno. Whoa—some modules swap pin spots, so give ‘em a quick peek.
SPI OLED Module Interfacing Connection Diagram
SPI takes a few more pins than I2C. Hook VCC to 5V, GND to GND, D0/CLK to digital pin 10, D1/MOSI to pin 9, RESET to pin 13, DC to pin 11, and CS to pin 12.
Arduino Code with Basic Text and Graphics Functions
To get an OLED grooving with Arduino, nab two libraries: Adafruit SSD1306 and Adafruit GFX. The code’s nearly the same for I2C or SPI. Kick things off with display.begin(). Then toss in commands like display.setTextSize(), display.setCursor(), display.print(), or display.println(). Finish with display.display().
Here’s a quick taste:
display.setTextSize(1);
display.setTextColor(WHITE);
display.setCursor(0,28);
display.println(“Yo, world!”);
display.display();
You can doodle shapes too, like boxes (drawRect), circles (drawCircle), or triangles (drawTriangle), or fill ‘em with matching fill commands.
For scrolling text, try this zany trick:
display.startscrollright(0x00, 0x07);
It slides text left to right across the screen.
Displaying Image on OLED Display
To flash a pic on an OLED:
First, make sure the image fits the screen, like 128×64. Use a tool like Image2cpp to make it a hex array for Arduino. Then pop in:
display.drawBitmap(x,y,image_array,width,height,color);
That splashes your pic on the screen.
Commonly Asked Questions about using OLED Display with Arduino
What’s an OLED display module?
An OLED is an Organic Light Emitting Diode. It’s a self-glowing screen with thin organic layers between an anode and cathode.
What’s the display controller in these OLED modules?
SSD1306, SH1106, SSD1327, SH1107, and SSD1309 are the go-to controllers for small OLED modules.
What kind of protocol do OLED modules use?
They vibe with I2C or SPI protocols.
What are the usual OLED display sizes and resolutions?
OLEDs come in lots of sizes, but 0.96” and 1.3” with 128×64 dpi are the top picks.
Arduino OLED module not working?
If your OLED’s being a grump:
- Check Connections: Ensure wires from OLED to Arduino are snug and right.
- 전원 공급 장치: See if the OLED’s got enough juice from the Arduino or maybe an extra power source.
- Library and Code: Double-check you’ve loaded the right libraries for the OLED.
- Use Proper Protocol: Pick I2C or SPI, whatever’s correct.
- I2C address: For I2C modules, peek at the address, like 0x78 or 0x7A.
- Test with Example Code: Run sample code to see what’s up.
- Check Display Settings: Match settings to your module.
- Look for Hardware Issues: Hunt for busted bits or wiggly wires.
- Try Another Arduino: Swap boards to check if the Arduino’s the troublemaker.
Custom OLED Display with Arduino from Miqidisplay

미키디스플레이’s got a giant stash of PMOLED modules that click with Arduino, from 0.66 inch to over 3 inches, working with I2C or SPI. Their star, the “0.96 inch Graphic LCD display module 128*64 SH1106 Support Arduino,” is mega cool for tiny wearable gadgets since it barely uses power.
They can tweak cables, pins, or their spots to fit your project, making tough industrial jobs a snap. You can also grab custom-cut cover glass for extra toughness, perfect for medical gear or car dashboards.
With over 20 years of know-how, 미키디스플레이 rocks fancy auto production and testing gear, backed by ISO certifications like TS-16949.
자주 묻는 질문
Can Miqidisplay customize my project needs?
You betcha! Their engineering whizzes can whip up a display that’s just right for your gig.
Does Miqidisplay do small orders?
Totally! They’re chill with tiny or big custom batches.
How quick does Miqidisplay ship?
Over 90% of orders zoom out same-day, thanks to their zippy warehouse.
Got any pre-certified models?
Their stuff’s got big-deal certifications like TS-16949, ISO-9001, and ISO-14001.
Hooking an OLED display to Arduino sparks tons of fun ideas—from simple text for DIY projects to slick graphics for pro gear. Miqidisplay’s custom displays and pro tips make sure you get top-notch results every time.